搞半天还要自己拼?手搓一份Mangowc配置和声明式配置体验
0.前言
在配置好niri+DMS的方案之后,我原本以为几乎已经毕业,但是有人竟然挑刺,声称空载内存太高,于是我蠢人灵机一动找来同样是跑在wayland上的mangowc,因为这个合成器似乎占用更少。在网络上对于mango的评价和抨击主要在于社区资料太少,其他的倒没有什么评价。我查了一下资料确实少,可能也比较难找,不过作者给出了还算详尽的文档。不想看咋办?让ai帮你看得了。于是我先准备了gemini在旁边陪嫁,然后突然蠢人灵机一动套用了mangowc作者自己在github上发的一个配置,结果发现臭不可闻,不知道这个作者什么审美,给屏幕装一个莫名其妙的屎黄色蓝光滤镜,图标和字体更是不知道哪来的狗屎审美,我当即觉得mangowc难堪大用,一通pacman -R把他们都枪毙了。但是上了一天课之后,我突然反思,我觉得可能是dms那种高度集成化配置的轮椅坐多了害我没法走路了,那个作者配置的用的自己舒心完全是因为配置文件是他从头到尾手搓的,如果我想要一份舒心的配置,我显然需要也从头为自己去定制一套配置,感受强大的声明式配置,顺便练习使用neovim+lazyvim(其实中途好多次叛逃去kate),然后放到网上引得别人来用然后重走我的老路。
1.配置
1.0 准备环境/从默认配置开始
首先保准依赖:
sudo pacman -S --needed base-devel git libinput mesa wlroots libxkbcommon pixman hyprlang
之后再次动用aur神力:
yay -S mangowm-git
其实这一步会帮你补全依赖的。但是为了保险pacman那一项我也跑了一次。
之后我们需要:
Create Configuration Directory
mangowm looks for configuration files in ~/.config/mango/.
-
1mkdir -p ~/.config/mango - Copy Default Config
A default configuration file is provided at
/etc/mango/config.conf. Copy it to your local directory to start customizing.
|
|
这样我们就有了一份默认的配置文件。现在来对这份文件开刀,一步步改成适合自己的。下面我把改动的地方列出来,其他的按默认就行了。
1.1 屏幕、动效、T430适配
旧的硬件不能调得太激进,更何况T430是来自2012的老兵。
|
|
1.2 触控板
|
|
1.3 窗口占比、大小、间距、niri卷轴逻辑:
|
|
1.4 去掉屎色滤镜
根源性的“屎黄”色彩 (Rootcolor)
在 Appearance 区域,作者预设了:rootcolor=0x201b14ff
- 问题:这正是那个“屎黄”根源。在 Wayland 下,如果窗口有透明度或者壁纸没加载出来,这个底色会让你觉得屏幕坏了。
- 修正:改为深灰色或深蓝色(Tokyo Night 风格):
rootcolor=0x1a1b26ff - 作者脑子有病
1.5 快捷键(滚木)-模块化
|
|
我们采用模块化配置,因此我们在配置文件末尾声明:
source=./bind.conf
同时顺便创建一个配置开机自启的脚本:
exec-once=/home/pakiknowledge/.config/mango/autostart.sh
别忘了给它chmod +x哦。
1.6 快捷键
|
|
这套逻辑之下,mod+回车是开启终端,mod+左右是滚动。mod+数字是工作区切换,mod+q关东西,mod+space开启全局搜索。
终端我选择kitty,因为之前在niri下已经配置好了,就不再另起炉灶了。
搜索这里作者默认用rofi,我们换用fuzzel。
1.7 给个壁纸
这太简单了,用sway bg然后加进自启动脚本就行了。
1.8 waybar
到这里基本可以用,但是我现在需要一个状态栏,我们用waybar+mechabar。
首先mechbar的依赖:
sudo pacman -S --needed waybar brightnessctl wireplumber networkmanager upower
sudo pacman -S ttf-nerd-fonts-symbols-common otf-commit-mono-nerd ttf-font-awesome
克隆
git clone https://github.com/sejjy/mechabar.git ~/Downloads/mechabar
搬运配置:
cp -r \~/Downloads/mechabar/\* \~/.config/waybar/
先把waybar加入自启脚本里。
然后大的来了,因为mechabar不是为mango设计的,config.jsonc里一堆hyprland/开头的东西,mango不认整个bar直接爆了。
事已至此,手搓!
首先mango官网文档:
Module Configuration
mangowm is compatible with Waybar’s ext/workspaces module (Wayland standard) or the dwl/tags module. We recommend ext/workspaces for the best experience.
Tip: You can also use the dwl/tags module, but ext/workspaces provides better integration with mangowm’s features. The ext/workspaces module requires Waybar > 0.14.0.
config.jsonc
Add the following to your Waybar configuration:
{ “modules-left”: [ “ext/workspaces”, “dwl/window” ], “ext/workspaces”: { “format”: “{icon}”, “ignore-hidden”: true, “on-click”: “activate”, “on-click-right”: “deactivate”, “sort-by-id”: true }, “dwl/window”: { “format”: “[{layout}] {title}” }}
Styling
You can style the tags using standard CSS in style.css.
style.css
#workspaces { border-radius: 4px; border-width: 2px; border-style: solid; border-color: #c9b890; margin-left: 4px; padding-left: 10px; padding-right: 6px; background: rgba(40, 40, 40, 0.76);}#workspaces button { border: none; background: none; box-shadow: inherit; text-shadow: inherit; color: #ddca9e; padding: 1px; padding-left: 1px; padding-right: 1px; margin-right: 2px; margin-left: 2px;}#workspaces button.hidden { color: #9e906f; background-color: transparent;}#workspaces button.visible { color: #ddca9e;}#workspaces button:hover { color: #d79921;}#workspaces button.active { background-color: #ddca9e; color: #282828; margin-top: 5px; margin-bottom: 5px; padding-top: 1px; padding-bottom: 0px; border-radius: 3px;}#workspaces button.urgent { background-color: #ef5e5e; color: #282828; margin-top: 5px; margin-bottom: 5px; padding-top: 1px; padding-bottom: 0px; border-radius: 3px;}#tags { background-color: transparent;}#tags button { background-color: #fff; color: #a585cd;}#tags button:not(.occupied):not(.focused) { font-size: 0; min-width: 0; min-height: 0; margin: -17px; padding: 0; color: transparent; background-color: transparent;}#tags button.occupied { background-color: #fff; color: #cdc885;}#tags button.focused { background-color: rgb(186, 142, 213); color: #fff;}#tags button.urgent { background: rgb(171, 101, 101); color: #fff;}#window { background-color: rgb(237, 196, 147); color: rgb(63, 37, 5);}
Complete Configuration Example
Tip: You can find a complete Waybar configuration for mangowm at waybar-config.
意思是:不要用 wlr/workspaces 或 hyprland/workspaces,请认准 ext/workspaces。
编辑config.jsonc:
这样之后就算是把waybar配置成功“嫁接”进mango了。但是这个适合waybar还是不太能用的状态。这里的坑后面单独开一章讲。
1.9 自启动文件配置
|
|
1.10 让fuzzel适配壁纸的颜色
-
打开文件:
~/.config/fuzzel/fuzzel.ini -
修改
[colors]部分。颜色格式是RRGGBBAA(最后两位是透明度,ff是不透明):1 2 3 4 5 6 7 8 9 10 11 12 13 14 15 16 17 18[colors] # 背景:非常暗的紫黑色,保证对比度 background=141014f2 # 文字:淡淡的粉紫色,柔和 text=eddfedff match=c341c4ff # 选中行背景:取主色调,但降低饱和度和明度,避免反差太大 selection=9e329eff # 选中行文字:纯黑,保证清晰度 selection-text=000000ff # 边框:主色#c341c4 border=c341c4ff[colors] background=1a1b26ff /* 背景色 */ text=c0caf5ff /* 字体色 */ match=bb9af7ff /* 搜索匹配到的字符颜色 */ selection=89aa61ff /* 选中行的背景色 */ selection-text=1a1b26ff /* 选中行的字体色 */ border=89aa61ff /* 边框颜色 */
1.11 fcitx5在fuzzel里罢工
换用fuzzel-ime-git这个包。(用aur)
2. waybar/其他小问题
2.1 把waybar的西式日期显示改回YYYY/MM/DD
打开 ~/.config/waybar/modules/clock.jsonc,找到 clock#date 的部分,把 format 改成你想要的样式:
2.2 把TRAY托盘逻辑写回来
其实我不太需要这个,但是clash-verge我想右键让他进内核模式,不然它那个webkit太吃内存了。
依赖:
sudo pacman -S libappindicator-gtk3 libwaitman
确保 Waybar 已开启托盘模块
编辑 ~/.config/waybar/config.jsonc,确保 modules-right(或左/中)里包含 "tray",并且有对应的配置:
由于已经设置了自动包含 ~/.config/waybar/modules/*.jsonc,可以专门为一个托盘创建一个独立文件。
新建文件:nvim ~/.config/waybar/modules/tray.jsonc
写入内容:
3.配置后的空载内存/之后的改进
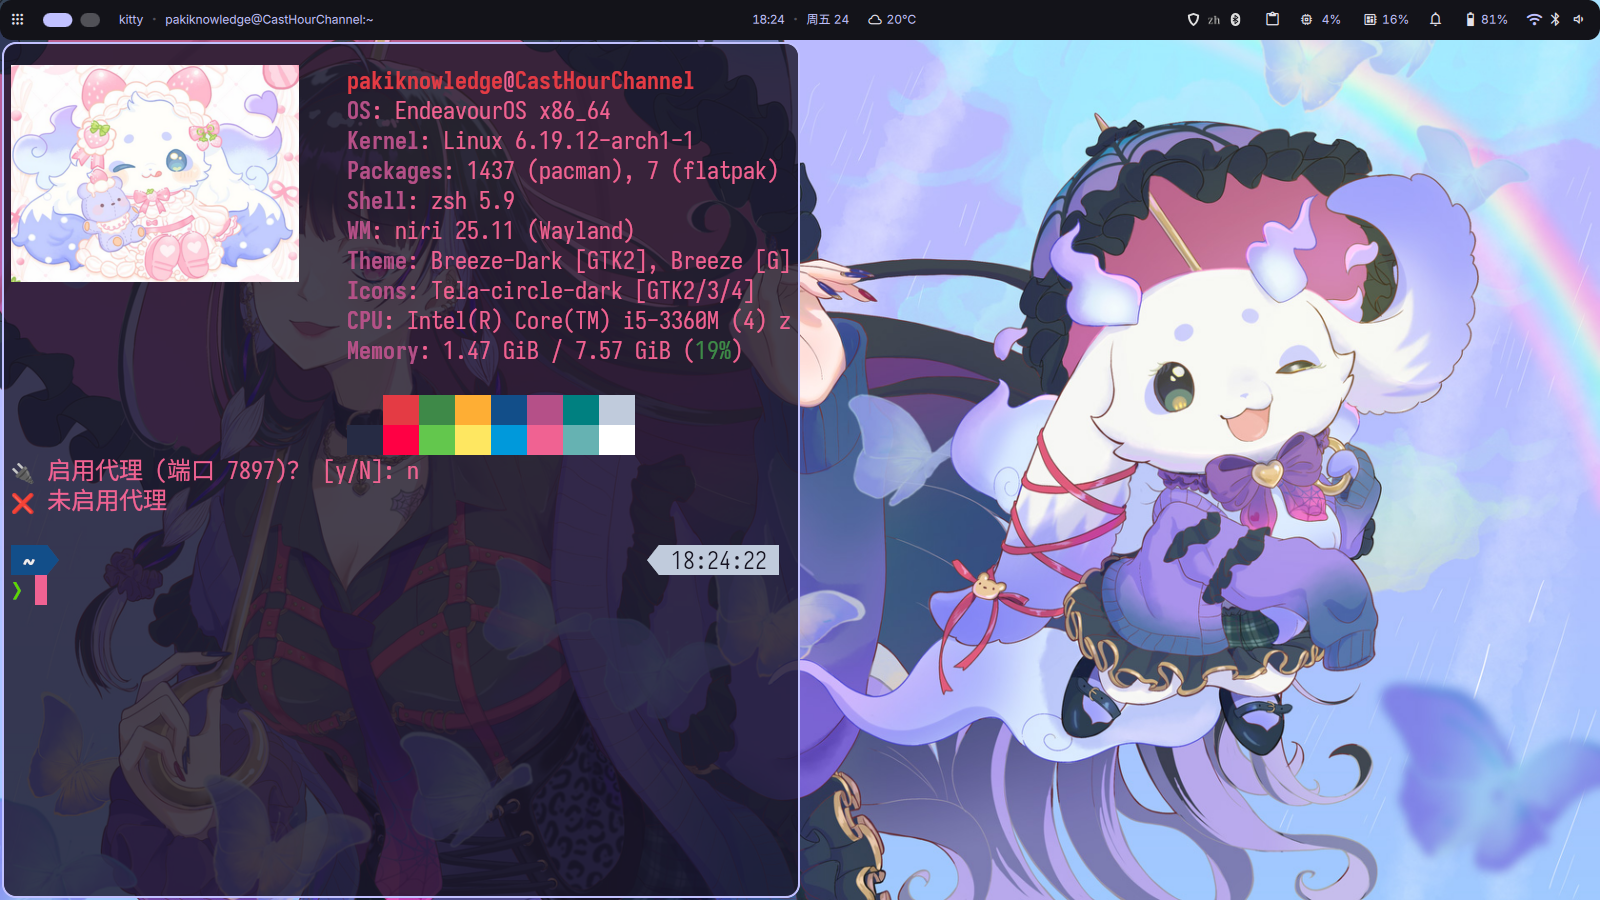
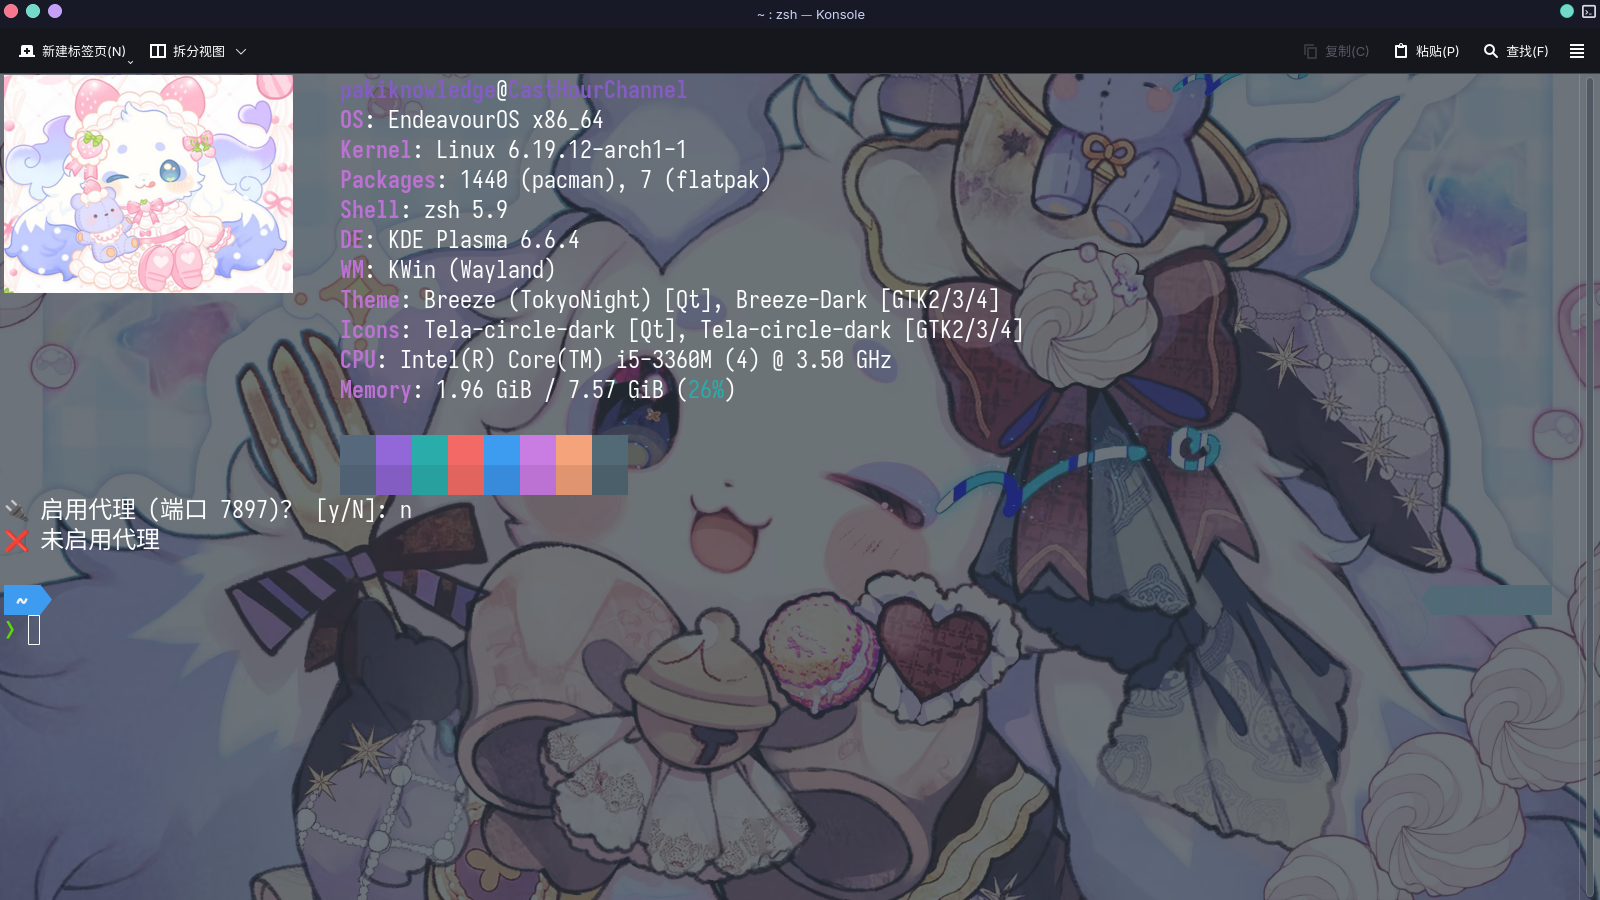
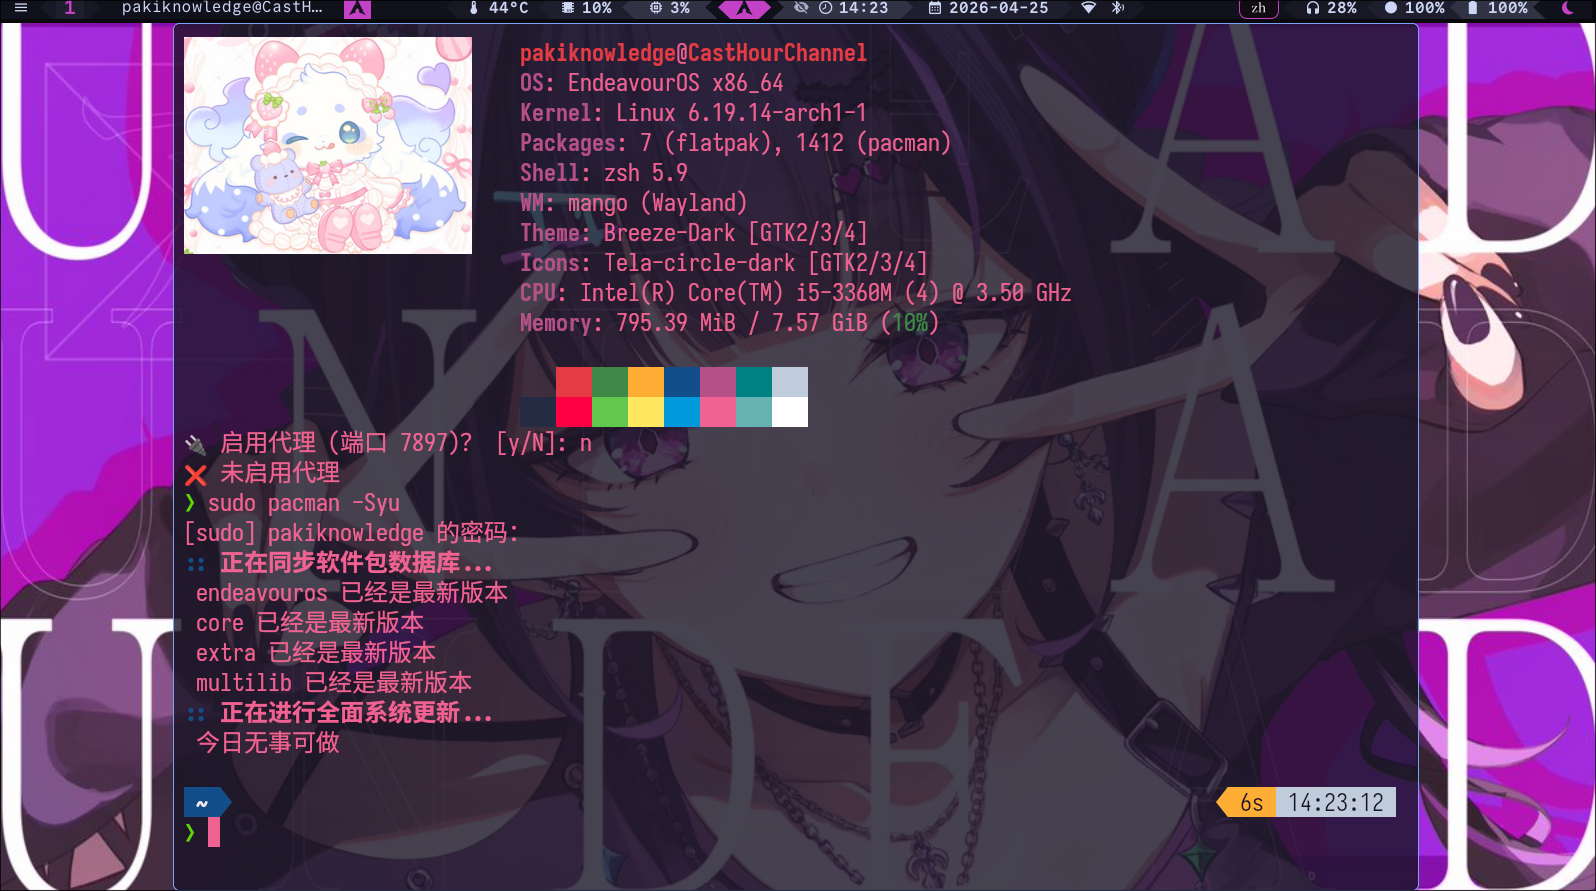
| 环境 | 空载内存 |
|---|---|
| niri+dms | 1.47G |
| KDE Plasma6 | 1.96G |
| mangowc | 795M |
后续改进方向:用matugen自动取色应用到waybar和fuzzel的配置里。